Now I now we all love our chocolate Easter eggs, whether crème filled, with soft toffee centres or full of posh and yummy chocolates. But as we all know, these aren’t waistline friendly. So here at Crafty Bug, we thought we would take a look at handmade decorative eggs of the non-edible sort. There are some great craft projects here for children and grown-ups alike.
Thread Eggs
This video tutorial for making eggs from string or embroidery floss is well worth a look. There is the opportunity to embellish the finished eggs as much as you like but the eggs are stylish as they are and, I for one, probably would only add some ribbons as shown in the video.
The presenter has an easy style and explains all the steps you need to take to create some really effective decorative Easter eggs. Helpfully, she also explains what the problems might be if your end product didn’t quite work out as planned.
The small eggs take 2 skeins of embroidery floss to complete but I think there may be an opportunity to use up those left over strands from completed embroidery projects. This would produce a multi coloured egg which might be an interesting effect. It could just be too fiddly to do, though. If you have a go at this, do get in touch to share your results and any thoughts.
A full range of embroidery silks is available at Minerva Crafts including some multi-hued threads which look great fun to use here.
How to Light Up Easter!
Another idea I’ve come across which would enhance any Easter table, is these gorgeous Easter egg candles. In order to make them egg shaped, the process involves emptying out the shell contents of either hen or duck eggs (depending on how big you want them to end up) and then using the empty shells as the moulds for the candles. You could always use the extracted eggs to make cakes, quiche, frittata or perhaps scramble them with a little smoked salmon and chives for an indulgent breakfast treat.
Start with dry, blown out eggshells. I used duck eggs because I wanted slightly larger candles, but any eggs will do! Grate or chop one crayon into small pieces and split between two Dixie cups. Fill both cups to the brim with soy wax flakes, then microwave in 1-minute intervals until soy wax and crayon wax have completely melted. Add essential oils for fragrance, and stir melted wax to incorporate the color.
Dip the wick in melted wax and send up through the outside bottom of the eggshell to adhere to shell. I also like to pour a tiny amount of slightly cooled wax down through the inside of the shell, this helps the wick stick to the shell, and sticks both the wick and shell to the wax paper which will help the eggshell stand on its own. Let the wax dry completely before moving on to the next step.
Before pouring the remainder of the wax (my eggs took two Dixie cups each of wax, approximately six ounces of unmelted wax), check to make sure it’s significantly cooler than what it was when you first took it out of the microwave. This will allow the wax to successfully be poured into the eggshell without melting the base that you previously sealed with the wick end. If any wax starts to pour out around the base you should let it cool, and be sure the base is sealed before attempting to pour again.
Once the candles cool completely (I let mine sit for 3 hours) carefully remove the eggshell, trim the wicks, and light your candles! Via helloglow.co
Decoupage Eggs
If you fancy having a go at making a pretty decoupage egg or two, it’s well worth taking a look at this video below. There is no commentary to the video but there are captions which are succinct but at the same time make the instructions absolutely clear. The eggs used are not edible ones but are Styrofoam in the shape of an egg. The whole video takes 13 minutes but is really engaging to watch, even without a commentary. I found I was quite hooked and wanted to see it through for the final result!
A whole bunch of these eggs made with some pretty spring or pastel designs would work really well hung on a mini Easter tree made from a branch or twigs. An Easter version of a Christmas tree, perhaps.
An Easter Decoration for Your Front Door
This is a simple project which shouldn’t take too long at all to complete. Wreaths are traditionally hung on front doors at Christmas, so why not extend the concept to Easter, particularly if you are going to be decorating inside your home for the season? And instead of using a wreath, simply tie together a bunch of prettily coloured Easter eggs and you have a fresh addition to your Easter theme ready for pinning to your front door.
A bundle of pastel Easter eggs works as a festive decoration for your front door. Wrap plastic foam egg shapes (available at crafts supply stores) with crepe paper, and attach the ends with glue or a small straight pin. Add yellow ribbon, secured with small straight pins, and leave a long end for tying. Gather the eggs at various lengths and tie the ribbons together. Finish with a pretty bow, and hang the decoration from a removable adhesive hook or wreath hanger. Via bhg.com
Clay Easter Eggs
Another “hanging” variety of Easter egg are these clay ones. These are particularly suitable for creating with children as an Easter craft project and can be hung on some decorative branches rather like Christmas tree ornaments. Or they could be strung from some coloured twine and hung above the mantelpiece to bring some Easter fun to the house.
These clay Easter egg decorations are so easy to make, and can be whipped up with the kids in an afternoon or two! Use whatever colours and designs you fancy!
Open the pack of clay and cut off as much as you think you’ll need – this will depend on how many decorations you want to make. Allow roughly a golf ball sized amount for each one.
Using your hands, knead the clay to warm it up and shape into a ball. On a clean surface, roll out with your rolling pin …. Read more…
Hopefully you will find the above ideas give you inspiration to have a go at making some fun Easter decorations to brighten up your home for the Easter celebration. After all, why should we confine ourselves to decorating our homes just for Christmas?
 Chocolate cake recipe + buttercream = the most beautiful St. Patrick’s Day Cake! Inspired by the beauty of shamrocks and all things green, this 2-layer naked Shamrock Cake is sure to be a crowd pleaser! Because it’s a 2-layer naked cake the bottom layer of frosting can be a fun “practice” layer. You can experiment with your piping and find out which techniques you like the best. Then the top layer can be covered with your favorite swirls and dollops! If you have never decorated a cake this is the cake for you. If you have decorated a 1,000 this is the cake for you. Simple design paired with amazing taste is always a winning combination!
 I happen to love the color green. I don’t think it gets nearly the attention it deserves. So when St. Patrick’s Day comes around I get super excited and start thinking up all these fun and yummy treats to make, in green! That’s why I decided to put together these St. Patrick’s Day Cake Pops. They are super cute and really fun to make.
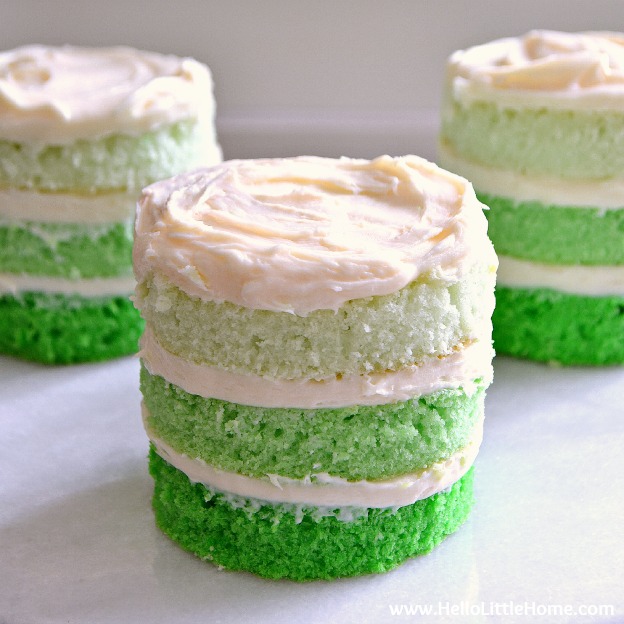 These St. Patrick’s Day Mini Ombre Cakes are the cutest, most delicious treat for your favorite holiday!
 Celebrate St Patrick’s Day with these easy chocolate Guinness cupcakes that are rich and delicious (and finished with a circle of icing sugar and a glittery shamrock, of course!). This is the ONLY thing you’ll want to bake for the all-important 17 March. This cupcake recipe makes for a really moist batch of cupcakes that will fast become a real family favourite. They are really easy to make and make a real difference to your usual cupcake recipe, so a great one to try if you want a treat and they’re not just for St Patrick’s Day. Using Guinness, these grown up cupcakes look and taste great. This recipe makes 24 cupcakes, so it’s a great recipe to make if you’ve got a crowd to feed or want something really special for a birthday party or get together. If you really want to make these look extra special on St Patrick’s Day, then top them off with edible glitter and shamrocks!


 Glitter glue such as this pack of

 Here you’ll find an inspiring collection of 60 line-art designs to colour at home, with family and or out and about.


 If you are not familiar with this charity, its aim is to support premature babies through their first days and struggles by providing crocheted and knitted octopi to soothe the newborn and reassure the parents. The idea is that when parents aren’t cuddling their babies, the octopi are there to comfort the newborns and give them something (the tentacles) to grip on to. As the charity’s story on Facebook says” These little toys are to make babies and their parents feel calmer and more safe. Children can play with their tentacles in a similar way they played with the umbilical cord in the mother’s womb. At the same time parents can have the little break they deserve, knowing their little precious ones are more safe and calm keeping tentacles in their little hands instead of pulling the tubes and cables out.”
 If you would like to put your woolen craft skills to use and would like to get involved with this extremely worthwhile project, may I suggest you take a look at either the charity’s


 The card on the left can be found on Pinterest (posted by

 Here’s another example of how to use buttons to create flower heads.
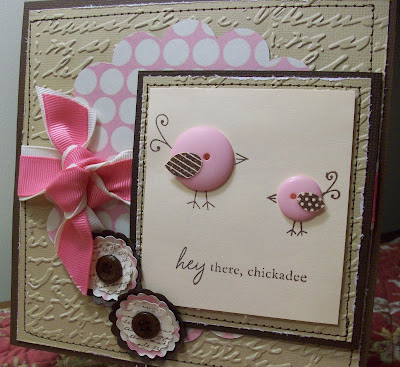 I’ve included this image on the left because I love the innovative way in which the buttons have been used in this design.I think that using one of the button holes as the eye for the chicks is just brilliant and I’m not sure I would have thought of this myself. That’s why the internet is such a great tool to allow ideas to be shared.
 Now here’s another way of using buttons in your card design that doesn’t have them portraying flowers.I like the design of this ice cream cone card. It’s clean and the use of a monochrome palate works really well. The use of the multi layers and mixed sizes of the buttons creates the illusion of the ice cream spilling over the edge of the cone.
 Another easy way to use buttons on your greetings card is to turn them into balloons. This gives you a free range over colour to make it as bright and colourful as you like. Or, of course, you can keep to just a couple of colours to complement your choice of card background .In the card shown on the left, the designer has cleverly reduced the size of the buttons used towards the top of the card. This introduces perspective to the design and really creates the impression of the balloons floating away into the distance.


